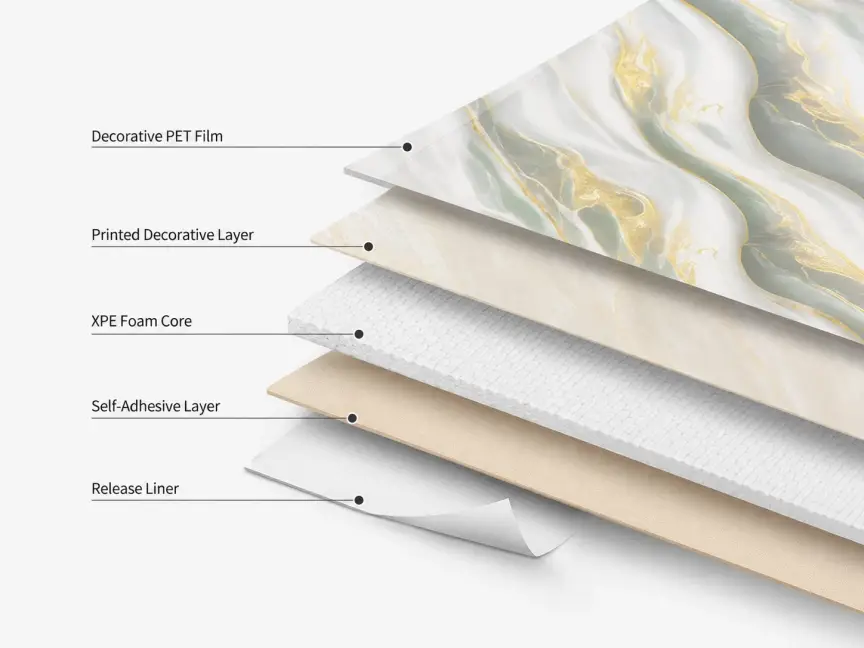
يبدو تركيب ألواح الحائط الخلفية اللاصقة بسيطًا لعدم الحاجة إلى استخدام المونة الرطبة، لكن النتيجة النهائية تعتمد على نوع الجدار، والورقة الأولى، والوصلات. تستخدم ملصقات الحائط الناعمة التي تحاكي الخزف طبقةً زخرفيةً من البولي إيثيلين تيريفثالات (PET) فوق طبقة من رغوة البولي إيثيلين المتشابك (XPE) مع طبقة لاصقة ذاتية. يتيح تصميمها المرن والقابل للقص تركيبها بدقة ورقةً تلو الأخرى.
يتم تركيبها بنجاح باتباع خطوات بسيطة: فحص الجدار، قياس وتحديد شكل النمط، قص قطع الحدود، إزالة الغطاء الخلفي، محاذاة كل ورقة على حدة، والضغط على الوجه والحواف. يُساعد تخطيط أماكن المقابس والزوايا والحافة النهائية قبل تثبيت الورقة الأولى على تجنب ظهور أجزاء ضيقة وانقطاعات غير مرغوب فيها في النمط لاحقًا.
حدد ما إذا كانت لوحة الحائط الخلفية الحالية مناسبة
يعتمد غطاء الجدران ذاتي اللصق على التلامس بينه وبين سطحه الخلفي. قبل فتح العبوة، تأكد من أن الطبقة النهائية الموجودة قادرة على تثبيت المادة اللاصقة.
ابدأ بسطح جاف وخالٍ من الغبار. تعامل مع التصاق التشطيب بالجدار المحدد كفحص أولي للمشروع، بدلاً من افتراض أن جميع أنواع التشطيبات ستؤدي نفس الوظيفة. يجب معالجة أي تشطيبات غير متماسكة، أو رطوبة زائدة، أو فجوات عميقة، أو حركة قبل التركيب؛ وعند الشك في ملاءمة السطح، تأكد من ذلك مع المورد واختبر عينة في منطقة غير ظاهرة.
تحقق من استواء السطح باستخدام مسطرة مستقيمة. قد تؤدي البقع المرتفعة أو الفواصل العميقة أو الحواف المكسورة إلى إعاقة التصاق المادة اللاصقة أو بقائها مرئية، لذا حدد ما إذا كان الجدار يحتاج إلى تجهيز قبل طلب الكمية الكاملة.
اتبع تسلسل تركيب الألواح
اجمع الأدوات
جهّز شريط قياس، قلم رصاص، ميزان تسوية أو مسطرة، قطعة قماش نظيفة، وأداة قطع مناسبة للورقة المرنة. استخدم سطح قطع ثابت بعيدًا عن الجدار النهائي. نظرًا لأن سُمك المنتج وتفاصيل القطع تختلف باختلاف المشروع، تأكد من الأداة المُفضّلة وأي متطلبات لمعالجة الحواف مع المورّد قبل البدء.
قم بقياس وتحديد موضع بلاط الجدار الخلفي
قم بقياس العرض والارتفاع الكليين، ثم حدد مواقع الخزائن، وأسطح العمل، والمقابس الكهربائية، والزوايا، والأطراف المكشوفة. تحقق من الحدود العلوية والسفلية بشكل مستقل بدلاً من افتراض أنها متوازية.
افرد الأوراق دون إزالة الغطاء الخلفي. استمر في اتباع النمط المطبوع عبر الوصلات، وغيّر نقطة البداية إذا كانت الخطة الأولية ستترك جزءًا ضيقًا جدًا في النهاية الظاهرة. حدد مرجع المستوى الأول، وانقل كل قياس للحدود إلى ظهر الورقة المعنية.
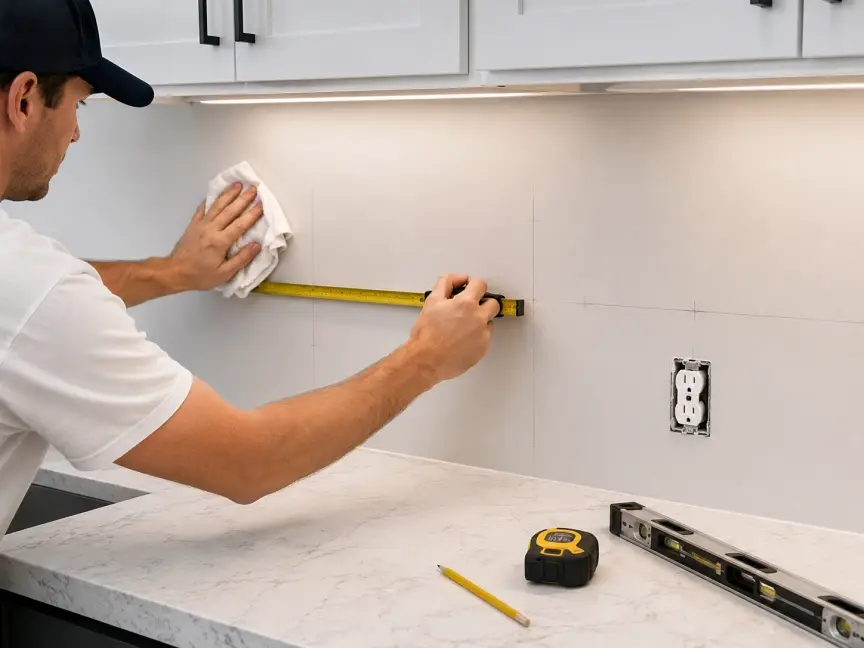
افحص الأوراق وخطط للحافة الأولية
افتح العبوة وانظر إلى نقش السطح والزوايا والطبقة الخلفية قبل التركيب. حافظ على القطع بنفس الاتجاه حتى تستمر خطوط البلاط أو الرخام المقلد بشكل طبيعي.
اختر حافة مرجعية علوية واضحة. يمكن أن يوفر الجانب السفلي للخزانة أو أي حد مستقيم آخر دليلاً بصرياً، ولكن تحقق منه بدلاً من افتراض أنه مستوٍ. تتحكم الورقة الأولى في الوصلات التي تليها.
قم بعمل قطع الحدود والزوايا والمخارج
يسمح التصميم المرن والقابل للقص بتركيب الألواح وفقًا للتصميم المُقاس. عند تركيبها على طرف جدار أو زاوية داخلية أو حدود خزانة، انقل القياس الفعلي إلى الجهة الخلفية وقم بالقص قبل إزالة ورق التغليف. جرّب تركيب القطعة على سطح جاف، وتحقق من النمط والحافة، وعدّل التصميم قبل اللصق.
إذا أثر مقبس كهربائي أو مفتاح على القطع، فلا تقم بإزالة غطاء اللوحة أو العمل بالقرب من الأسلاك. اطلب من كهربائي مؤهل التأكد من سلامة المنطقة وفقًا للوائح المحلية قبل تركيب الصفيحة المحيطة. قِس من حواف مرجعية ثابتة، وحدد مكان الفتحة على ظهر الصفيحة، ثم قم بعمل قطع دقيق يبقى بعيدًا عن علبة التوصيل الكهربائية. لا تُغطِّ علبة التوصيل الكهربائية أو تضع أي مواد بداخلها.
بالنسبة للزوايا الداخلية، قِس كل وجه من وجوه الجدار على حدة، وأنهِ كل سطح بدقة قبل البدء بالسطح التالي. أما في الزوايا الخارجية المكشوفة أو الأطراف المفتوحة، فاتفق على طريقة تشطيب الحواف للمشروع قبل القص؛ ولا تفترض أن استخدام الزخرفة أو المادة المانعة للتسرب أو التداخل أو حافة القطع المكشوفة مناسب دون التأكد من ذلك.
انزع ورقة الفصل
اقلب الورقة وافصل ورق التحرير عن الجزء الخلفي اللاصق. تجنب لمس المادة اللاصقة أكثر من اللازم. لسهولة التحكم، اكشف جزءًا كافيًا من الجزء الخلفي لتحديد موضع الحافة الأمامية، ثم استمر في التقشير أثناء الضغط على الورقة في مكانها.
لا تدع المادة اللاصقة المكشوفة تنطوي على نفسها. إذا انحنت ورقة مرنة أثناء التعامل معها، فادعمها بكلتا يديك وأعدها إلى وضعها المسطح قبل وضعها على الحائط.
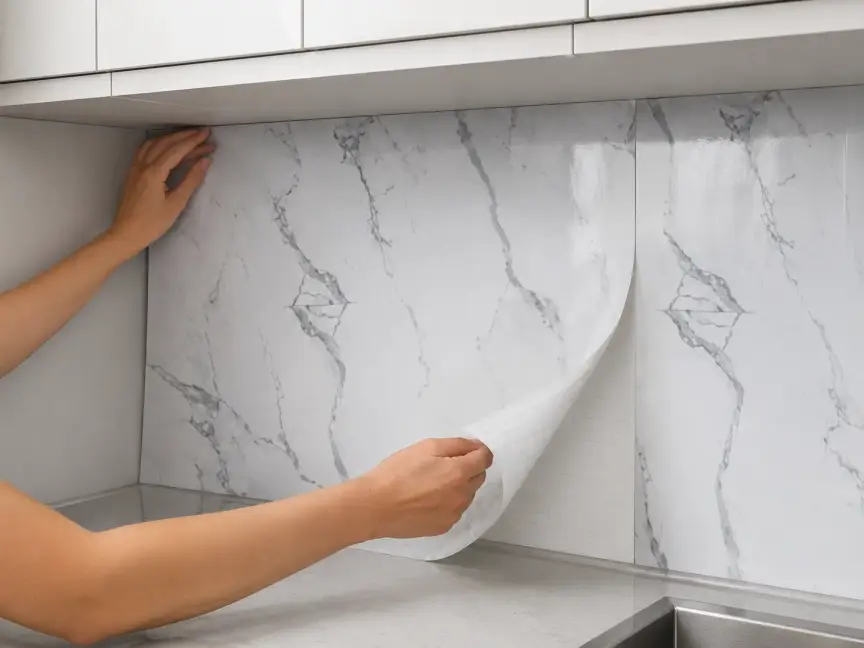
اضبط الحافة العلوية قبل كي الورقة كاملة
ضع الورقة على الحائط وقم بمحاذاة حافتها العلوية مع وصلة الجانب. اضغط برفق في البداية للتأكد من الوضع قبل الضغط على ظهر الورقة بالكامل. تأكد من أن الخطوط المطبوعة تتطابق مع الورقة المجاورة وأن الفجوة المرئية ثابتة.
بعد التأكد من الوضع الصحيح، قم بتمليس الورقة من الحافة المحاذية للخارج. هذا يدفع الهواء المحبوس نحو الجانب الحر بدلاً من حبسه تحت المنتصف. اعمل بثبات بدلاً من الضغط على كامل السطح دفعة واحدة.
قم ببناء لوحة الحائط الخلفية ورقة واحدة في كل مرة
أضف الورقة التالية بمحاذاة خط التماس المحدد. قارن بين الحافة الفعلية والنمط المطبوع. قد يكون خط التماس محكمًا بينما لا تزال خطوط البلاط المرئية غير متطابقة، لذا فإن كلا الفحصين مهمان.
استمر في وضع الورقة على طول الجدار بترتيب مُنظّم. إذا بدأت إحدى الأوراق بالانحراف، صحّحها قبل إضافة الورقة التالية. تتراكم أخطاء المحاذاة الصغيرة وتصبح أكثر وضوحًا مع مرور الوقت.
اضغط على الوجه والزوايا والدرزات
بعد تثبيته، اضغط على السطح ثم وزّع الضغط على الحواف الأربعة. ركّز جيدًا على الوصلات والزوايا والفتحات والحدود السفلية. الهدف هو ضمان تلامس متساوٍ للمادة اللاصقة، وليس سحق أو شدّ طبقة الرغوة.
استخدم يدًا نظيفة أو قطعة قماش ناعمة للضغط. أبقِ أداة القطع بعيدة عن السطح المزخرف بعد وضعه. إذا بقيت فقاعة هواء، حركها برفق باتجاه أقرب حافة حرة.
تحقق من السطح النهائي والحواف
تراجع للخلف وانظر إلى كامل الجدار الخلفي. ابحث عن الخطوط الأفقية المتدرجة، أو الفواصل المفتوحة، أو الزوايا المرتفعة، أو الهواء المحبوس، أو الأنماط المائلة، أو الألواح التي تتفاوت في ارتفاعها. غالبًا ما تكشف الإضاءة الجانبية عن الحواف التي يصعب رؤيتها من الأمام مباشرة.
تحقق من كل فتحة وطرف مكشوف للتأكد من مطابقته لتشطيب الحواف المحدد للمشروع. لا تُعدّ الادعاءات العامة المتعلقة بمقاومة الرطوبة والزيوت والتآكل والصدمات دليلاً كافياً على ملاءمة المنتج للاستخدام في المناطق الرطبة أو مصادر الحرارة أو الأماكن المعرضة للهب المكشوف. تأكد من حدود التركيب ومعالجة الحواف وطريقة التنظيف وأي وثائق اختبار مطلوبة للمشروع المحدد. لا تستخدم اللهب المكشوف مطلقاً لاختبار السطح المُركّب.
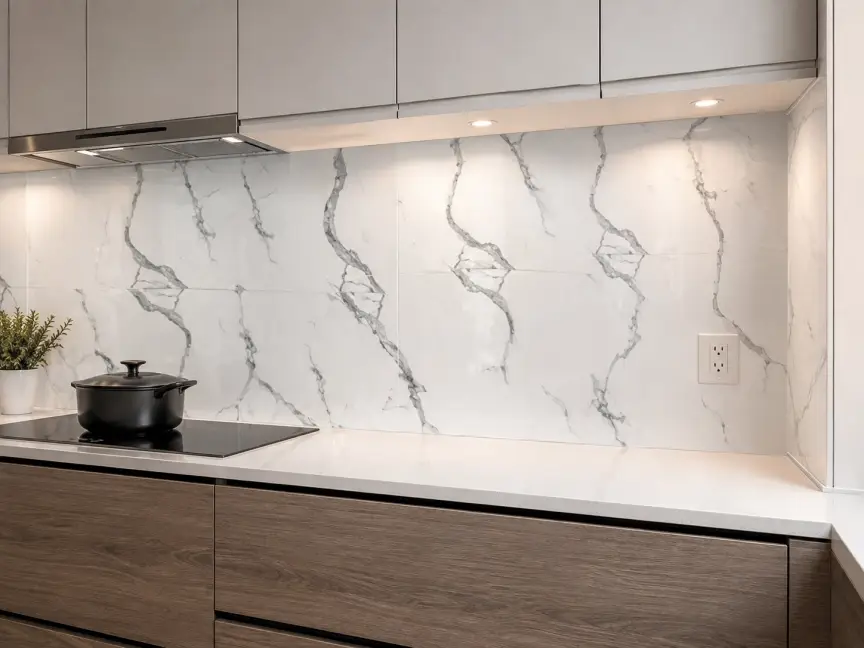
اعرف أين يكون هذا التحديث أفضل.
ملصقات جدارية ناعمة تُحاكي الخزف، مُصممة لأغراض التجديد والديكور. تتكون من طبقة رقيقة من البولي إيثيلين تيريفثالات (PET) ورغوة البولي إيثيلين المتشابك (XPE)، مما يوفر غطاءً خفيف الوزن ومرنًا مع ظهر ذاتي اللصق. تتوفر هذه الملصقات للاستخدام في المطابخ، وغرف المعيشة، وغرف النوم، والممرات، وغيرها من الجدران الداخلية، وذلك حسب متطلبات المشروع.
بالنسبة لجدار المطبخ الخلفي، تأكد من نوع السطح الأساسي، والمسافة من الحرارة أو اللهب، ومدى تعرض المنطقة المحيطة بالحوض للرطوبة، ونوع تشطيب الحواف المقترح. كما تتطلب الحمامات والغرف الأخرى المعرضة للرطوبة فحصًا خاصًا بالموقع. لا تُعتبر بيانات خصائص المنتج بمثابة شهادة لظروف تركيب محددة.
تصفح مجموعة ألواح الحائط من هواهونغ ديكور لمقارنة مواد الديكور المناسبة لمختلف الغرف. ولأن المجموعة تضم عدة أنواع من المواد، يُرجى تحديد نوع ملصق الحائط الناعم بدقة عند طلب عينات أو نصائح حول التركيب.
قم بإعداد تفاصيل المشروع قبل الطلب
يرجى تقديم أبعاد الجدران، وصور للتشطيب الحالي، وعدد ومواقع المقابس الكهربائية، والتصميم المطلوب، وحالة الغرفة. بالنسبة للمطبخ، حدد أيضًا العلاقة بين الألواح والحوض، والموقد، وسطح العمل، والخزائن، وحواف الجدران. تساعد هذه التفاصيل في تحديد كمية الألواح، واتجاه التصميم، وما إذا كانت هناك حاجة إلى تحضير إضافي للسطح.
اطلب أبعاد اللوح الحالية، ورقم دفعة اللون، وكمية التعبئة، وقيود السطح، وإرشادات تشطيب الحواف، وأي وثائق مطلوبة للموقع المقصود. يمكن استخدام عينة للتحقق من اللون، وحجم النقش، وملمس السطح، وجودة القطع، والالتصاق على الجدار الفعلي قبل طلب كمية أكبر.
لاختيار المنتجات ودعم المشاريع، تفضل بزيارة هواهونغ ديكور أو أرسل تفاصيل الجدار إلى الفريق.
FAQ
س1: ما مقدار المواد الإضافية التي يجب أن أضيفها للقص ومحاذاة النمط؟
أ1: اعتمد في الطلب على مساحة الجدار الخلفي المقاسة بالإضافة إلى التصميم الفعلي الجاف، بما في ذلك قطع الحدود والزوايا وفتحات المقابس وموضع النقش. تأكد أولاً من أبعاد الألواح وكمية التعبئة؛ فالزيادة المناسبة تعتمد على التصميم وليس على نسبة مئوية ثابتة.
س2: متى يجب عليّ الاستعانة بفني كهربائي مؤهل أثناء عملية التركيب؟
أ2: لا تقم بإزالة غطاء اللوحة أو العمل بالقرب من الأسلاك كجزء من تركيب لوحة الحائط. اطلب من كهربائي مؤهل التأكد من سلامة المنطقة وفقًا للوائح المحلية قبل قياس اللوحة المحيطة وتركيبها.
س3: هل يمكن تركيب الملصقات مباشرة خلف الموقد أو في منطقة تناثر الماء من الحوض؟
ج٣: تعامل مع كلا الموقعين كفحصين خاصين بالمشروع. لا تُؤكد مقاومة الرطوبة والزيوت على خلوهما من الحرارة أو اللهب المكشوف، أو تعرضهما لفترات طويلة، أو امتثالهما للمتطلبات المحلية. زوّد المورّد بنوع الجهاز، والمسافات، وحالة الجدار، وتفاصيل الحواف قبل اختيار الموقع.
س4: ما الذي يجب عليّ التأكد منه قبل اختيار تشطيب الحواف؟
ج٤: حدد ما إذا كانت الحافة تلتقي بخزانة، أو سطح عمل، أو زاوية داخلية، أو زاوية خارجية، أو نهاية جدار مكشوف. ثم تأكد من التشطيب الموصى به للمنتج المحدد ومكانه؛ لا تختر الحواف، أو مواد منع التسرب، أو التداخل، أو حافة القطع المكشوفة بناءً على طريقة تركيب عامة فقط.